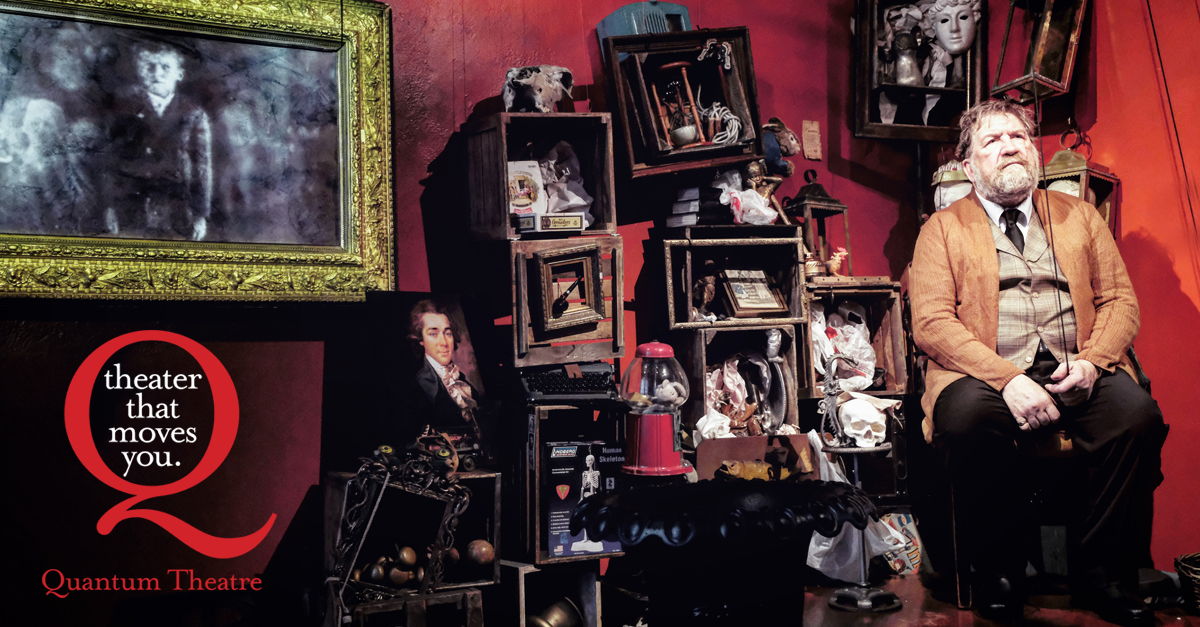
Thank you to everyone who experienced Chatterton. Maybe you were only able to come once and are interested in the other journeys. Maybe you just want some more information on a favorite character. You can find both here.
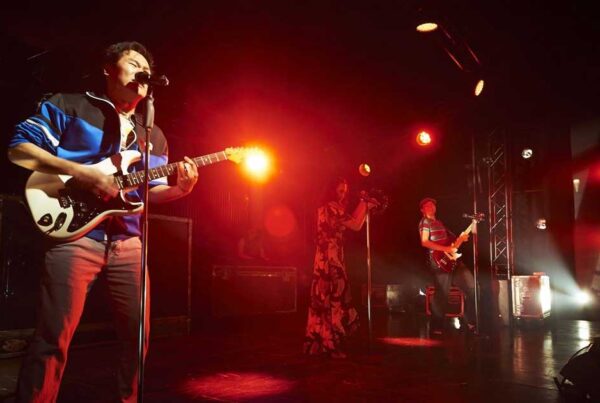
We all begin together in the sanctuary for a brief introduction to some characters we meet later. Then we separate into three distinct journeys, summarized below.
Act 1 – The Journey of the Typewriter
We first follow Charles Wychwood, a modern day poet experiencing episodes of headaches and visions, to Leno’s Antiques, where we meet Mr. & Mrs. Leno, an odd couple surrounded by curios. He is there to sell a book, but, when disappointed at the offered price, he instead trades it for an intriguing portrait of an unknown 18th century man.
Charles lives with his wife, Vivien, and their son, Edward in a small flat in London, where we journey next. When a family friend, Philip, a librarian, comes to dinner, they discuss the portrait, and their old friend, Andrew Flint. Flint has recently published a novel called Mean Time, and Charles and Philip are both scathing about it. While Charles is putting Edward to bed, Philip realizes the portrait resembles Thomas Chatterton, albeit in middle age – which cannot be, since Thomas Chatterton famously killed himself at the age of 17.
Charles gets a phone call from Harriet Scrope, a novelist for whom he used to work. We travel next to her sumptuous flat where we meet her and her stuffed cat, Mr. Gaskill.
Charles brings her some copies of his poems, in which she halfheartedly feigns interest, before she gets directly to her point – she wants Charles to ghostwrite her memoirs. He agrees, and she hurries him out, looking longingly at her readily-accessible bottle of gin.
Upon leaving the flat, Charles collapses and has a vision – Thomas Chatterton appears and asks, “So, you are sick?” to which he replies, “I know that I am.” Chatterton tells him he will come for him again, but not yet.
We continue with him to his flat, where we learn that Vivien works in an art gallery called Cumberland & Maitland. She leaves for work and we return to Leno’s Antiques with Charles and Edward. They learn that the picture was sold to the antiquers by a man named Joynson, who lives in Colston’s Yard Bristol. Charles places a phone call to the address and is promptly invited to visit. He brings Philip along. We follow him outside, where he meets Pat, a flamboyant exercise queen, who reveals that the portrait belonged to his partner. Pat gives Charles a bag full of old manuscripts and Charles reconvenes with Philip inside St. Mary Redcliffe, the church where Chatterton spent much of his youth.
We journey with Charles and Philip to the flat, where they read aloud from Chatterton’s manuscripts, which invokes a ghostly Thomas Chatterton to appear. We learn there that Chatterton, at the suggestion of his publisher, one Samuel Joynson, faked Chatterton’s death so that he could make money by writing works under the names of famous poets from the age. We realize that the man who gave Charles the papers must be a descendent of this publisher. Charles and Philip know they must get the papers published, and Charles decides to take them to Harriet, who could help them. Philip mentions that he had realized that Harriet Scrope’s novels had the same plots as some earlier novels by Harrison Bentley.
Harriet is quite excited by the papers, and it becomes obvious that she would like to take them from Charles to publish them herself and receive credit for the discovery. Charles does not allow her to take them. Charles mentions Philip’s discovery of the plot similarities between her work and Bentley’s and she is frazzled and exits. The audience is able to see her inner distress about having been discovered as she speaks into a backstage camera. After her initial panic, which Charles is not privy to, he immediately assures her that all writers copy. They are interrupted by the arrival of Sarah Tilt, a famous art critic and Harriet’s friend.
Her entrance prompts Charles to leave and we follow him home. There he finds his son standing on his head and gets irrationally worried about him. He calls Philip, Harriet, and his friend Andrew Flint separately to invite each to dinner the following week at an Indian restaurant to celebrate his discovery of the Chatterton manuscripts. He also begins to record his preface for the publication. Throughout these events he becomes more and more distracted and less able to form coherent sentences, pointing to his devolving condition around his headaches. Edward becomes worried about his father’s condition and suggests they go out. Edward blames the Chatterton portrait for making his father sick. Charles asks “if I show you a picture of him dead, would you believe that?” and off they journey to the Tate.
We follow Edward and Charles to the museum housing The Death of Chatterton, by Henry Wallis, an artistic representation of Chatterton’s fate painted about 100 years after he died.
Edward points out that the face in this painting is different than the portrait they have, and Charles remembers that, of course, the painter used a model to paint Chatterton. That model was George Meredith, a Victorian poet. “So Chatterton isn’t dead yet!”
We then meet with the other groups for the Indian dinner mentioned. Charles has gathered his wife, Vivien, Philip, Harriet, their friend Andrew Flint to discuss the discovery and imminent publication. Before he is able to do more than defend poetry as important to the skeptical Andrew Flint, Charles collapses and must be carried off.
Act 1 – The Journey of the Pen
We remain in the sanctuary after the typewriter group leaves where we hear directly from Thomas Chatterton details of his early life. When he tells a story of how he used to parody women, Harriet Scrope is bothered and exits, and the Pen journey follows her.
We enter her flat, where we meet her stuffed cat, Mr. Gaskill. We learn that she is very anxious about what will happen to her things when she dies. Her assistant enters and they discuss the writing of Harriet’s memoirs. It becomes clear that Harriet would like Mary to write them for her. Mary is confused and exits and Harriet begins drinking gin from a spoon. She calls a friend to ask if she can visit.
A rapid dose reduction or abrupt withdrawal of Xanax may cause a withdrawal syndrome, the symptoms of which can range from mild dysphoria and insomnia to severe syndrome with abdominal and skeletal muscle spasms, vomiting, increased sweating, tremors and convulsions. Withdrawal syndrome is more common in individuals who have been receiving Xanax for https://medtecllc.com/xanax-online/ a long time (more than 8-12 weeks).
We follow her to the apartment of Sarah Tilt. The two have a rather passive-aggressive friendship. We learn – though Harriet resists asking about it – that Sarah is writing a book called The Art of Death, about artistic representations of famous deathbeds. Harriet, to change the subject from death, which she clearly fears, begins leafing through an art magazine. She finds a Seymour painting, who she claims is her favorite artist. Sarah tells her that a local gallery called Cumberland & Maitland is having a showing of his works and Harriet could buy the painting she likes. She mentions that the office manager at the gallery is named Vivien, who we later find out is Charles’s wife. Harriet confesses that she is having trouble writing her memoirs and Sarah suggests she ask Charles to help her write them.
We take a circuitous route back to her flat. We arrive shortly before Charles Wychwood, who has come on her invitation. He has brought her some copies of his poems, in which she halfheartedly feigns interest, before she gets directly to her point – she wants Charles to ghostwrite her memoirs. He agrees, and she hurries him out, looking longingly at her readily-accessible bottle of gin.
She falls into a drunken sleep and we see a dream that indicates her fear that Charles may somehow replace her. It also connects to a haunting kinship she has been feeling with Thomas Chatterton. When she awakes she has had an epiphany – perhaps the Vivien that Sarah mentioned is the same Vivien that Charles indicated was his wife. She decides to go to Cumberland & Maitland and find out.
We get to Cumberland & Maitland where we learn that, in fact, it is the same Vivien. We also find out that the gallery owners have purchased some paintings by Joseph Seymour, who has recently died. His assistant, a Stewart Merk, has come to show them some more paintings. It turns out Mr. Merk has avoided selling the paintings to Seymour’s dealer, Sadlier, who had sold them while the painter was alive. There are hints that the gallery owners are not quite convinced by the story that Seymour gave Merk all of the paintings when he died.
We leave the art gallery and run into Philip, who we have not met before. He tells us that we are in Bristol, family seat of one Thomas Chatterton, and mentions that Charles is sick. It appears that the church is haunted by the ghost of Thomas Chatterton. An old woman surprises Philip and tells him that they never did find Chatterton’s body. She gives him a pamphlet about the poet’s life, and points out the frontage of the house where he grew up.
Charles Wychwood enters clearly reconvening with Philip on a trip they made together.
We journey with Charles and Philip to the flat, where they read aloud from Chatterton’s manuscripts, which invokes a ghostly Thomas Chatterton to appear. We learn there that Chatterton, at the suggestion of his publisher, one Samuel Joynson, faked Chatterton’s death so that he could make money by writing works under the names of famous poets from the age. We realize that the man who gave Charles the papers must be a descendent of this publisher. Charles and Philip know they must get the papers published, and Charles decides to take them to Harriet, who could help them. Philip mentions that he had realized that Harriet Scrope’s novels had the same plots as some earlier novels by Harrison Bentley.
When we get to her flat, Harriet is quite excited by the papers, and it becomes obvious that she would like to take them from Charles to publish them herself and receive credit for the discovery. Charles does not allow her to take them. Charles mentions Philip’s discovery of the plot similarities between her work and Bentley’s and she is frazzled and exits. The audience is able to see her inner distress about having been discovered as she speaks into a backstage camera. After her initial panic, which Charles is not privy to, he immediately assures her that all writers copy. They are interrupted by the arrival of Sarah Tilt. Charles exits quickly and Sarah tells Harriet that the Seymour she likes is up for auction at Cumberland & Maitland. Harriet realizes that Vivien may be able to help her get the manuscripts from Charles.
Harriet and Sarah head to Cumberland & Maitland, where Harriet flirts ridiculously with Cumberland, much to Sarah’s disgust. Harriet finagles the situation to remain alone with Vivien, where she enlists Vivien’s help in taking the manuscripts from Charles. Vivien agrees because she is so worried about Charles’s health and thinks the problems might be stemming from his obsession with Chatterton.
We then meet with the other groups in an Indian restaurant. Charles has gathered Vivien, Philip, Harriet, their friend Andrew Flint to discuss the discovery and imminent publication of the Chatterton manuscripts. Before he is able to do more than defend poetry as important to the skeptical Andrew Flint, Charles collapses and must be carried off.
Act 1 – The Journey of the Quill
We all begin together in the sanctuary, where we meet a diverse cast of characters and hear a brief line or two from each of them. In very short order, the first group, on the journey of the typewriter, departs. We remain in the sanctuary after the typewriter group leaves where we hear directly from Thomas Chatterton details of his early life. When he tells a story of how he used to parody women, Harriet Scrope is bothered and exits, and the Pen journey follows her.
He continues and we learn that his father was the singing master at St. Mary Redcliffe in Bristol and died before he was born. He and his mother were close, and she told him stories of the past and his father, prompting him to explore St. Mary Redcliffe, and develop his love of antiquity. He was a solitary boy who spent much time educating himself by reading books from his father’s library. When his mother discovers an ancient manuscript in the church he tells us he immediately goes to look for more.
He interrupts his story here and takes us to a modern flat, which is the home of Sarah Tilt, a famous art critic. Shortly her friend, the woman who had left abruptly earlier, Harriet Scrope, enters. The two have a rather passive-aggressive friendship. We learn – though Harriet resists asking about it – that Sarah is writing a book called The Art of Death, about artistic representations of famous deathbeds. Harriet, to change the subject from death, which she clearly fears, begins leafing through an art magazine. She finds a Seymour painting, who she claims is her favorite artist. Sarah tells her that a local gallery called Cumberland & Maitland is having a showing of his works and Harriet could buy the painting she likes. She mentions that the office manager at the gallery is named Vivien. Harriet confesses that she is having trouble writing her memoirs and Sarah suggests she ask one Charles Wychwood to help her write them.
We then journey to Charles Wychwood’s modern-day flat, where we learn that Charles has found a portrait of a middle-aged Thomas Chatterton. Charles and his friend Philip are hypothesize that Chatterton faked his own death and kept on writing in secret.
We leave and Chatterton takes us to the room in St. Mary Redcliffe where his mother had discovered the old manuscripts. He finds many more, in gothic style, and reads them so much that he finds himself able to imitate the style. He begins composing histories and family trees, and claiming them to be discoveries rather than inventions, is able to sell them. However, he prefers to write poetry, so he begins to compose poetry in the style and claims it all to be the work of an imaginary 15th century monk named Thomas Rowley. He is befriended by a bookseller named Sam Joynson, who suspects the truth. He tells us of his desire to leave sordid Bristol and make his fortunes in London.
He leads us back into the modern age, into a gallery called Cumberland & Maitland. We learn that the gallery owners have purchased some paintings by Joseph Seymour, who has recently died. His assistant, a Stewart Merk, has come to show them some more paintings. It turns out Mr. Merk has avoided selling the paintings to Seymour’s dealer, Sadlier, who had sold them while the painter was alive. There are hints that the gallery owners are not quite convinced by the story that Seymour gave Merk all of the paintings when he died. We also learn that Charles Wychwood’s wife, Vivien, works at this gallery.
We leave the art gallery and run into Philip, who we have not met before. He tells us that we are in Bristol, family seat of one Thomas Chatterton, and mentions that Charles is sick. It appears that the church is haunted by the ghost of Thomas Chatterton. An old woman surprises Philip and tells him that they never did find Chatterton’s body. She gives him a pamphlet about the poet’s life, and points out the frontage of the house where he grew up. Charles Wychwood enters clearly reconvening with Philip on a trip they made together.
We journey with Charles and Philip to the flat, where they read aloud from Chatterton’s manuscripts, causing our leader to join the retelling. We learn there that Chatterton, at the suggestion of his publisher, one Samuel Joynson, faked Chatterton’s death so that he could make money by writing works under the names of famous poets from the age. We realize that the man who gave Charles the papers must be a descendent of this publisher. Charles and Philip know they must get the papers published, and Charles decides to take them to Harriet, who could help them. Philip mentions that he had realized that Harriet Scrope’s novels had the same plots as some earlier novels by Harrison Bentley.
We return to Cumberland & Maitland, where Seymour’s dealer enters and tells us that the Seymour paintings are fakes. Merk, the former assistant, confesses that he is the true painter, but also threatens that all the recent works sold to Sadlier were also painted by him. Sadlier, Merk, and the gallery owners come to an uneasy agreement to not expose the forgeries in the interest of continuing to sell the paintings. Suddenly, the intercom announces the arrival of Harriet Scrope and Sarah Tilt. Harriet flirts ridiculously with Cumberland, much to Sarah’s disgust. Harriet finagles the situation to remain alone with Vivien, where she enlists Vivien’s help in taking the Chatterton manuscripts from Charles. Vivien agrees because she is so worried about Charles’s health and thinks the problems might be stemming from his obsession with Chatterton.
We then meet with the other groups in an Indian restaurant. Charles has gathered Vivien, Philip, Harriet, their friend Andrew Flint to discuss the discovery and imminent publication of the Chatterton manuscripts. Before he is able to do more than defend poetry as important to the skeptical Andrew Flint, Charles collapses and must be carried off.
-End of Act I-
Act II
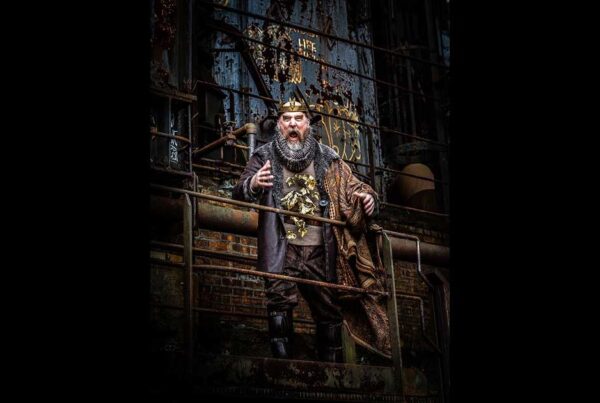
We all begin Act II together, and in the Victorian era. We meet Henry Wallis, a painter obsessed with creating a portrait of Thomas Chatterton’s deathbed. He is in the home of the poet George Meredith and his wife, Mary Ellen, attempting to persuade George to pose as Chatterton.
The scene changes and it is now early morning. George reads to Mary Ellen a letter from Henry. It turns out that through an acquaintance, Henry has gotten access to the actual room where Chatterton died. He asks George to meet him there. We discover briefly that not all is quite right between the Merediths.
It’s a new day, and the garret room of Thomas Chatterton is revealed to us. Henry sketches George in the pose until Mary Ellen enters and startles him. She asks Henry to tell her about how he will proceed with the painting, saying she knows nothing about it because her husband never speaks to her of serious things. Mary Ellen sits down heavily when Henry mentions having George actually take arsenic, a sort of joke about depicting the reality more clearly. When George exits to get her water, Henry tenderly tells her that he wonders about her secrets. The moment is broken when George quickly re-enters.
We exit to the sanctuary where we see our modern day Charles Wychwood lying in a hospital bed. We see his flatline before we return to the Victorian story.
George Meredith is now in Henry Wallis’s studio, and clearly his mood has gone sour. He brings up the idea of having a woman take poison in his next poem. Suddenly, they smell smoke, and we see a fire at Chelsea Wharf. The men are worried for Mary Ellen, who is supposed to be there. George leaves and suddenly Henry sees Mary Ellen. She runs to him and then asks him to please invite her to his studio to see the finished painting. She clarifies that she would like to come without her husband.
Next we see the Merediths traveling through London, where Mary Ellen gets more and more upset. They watch a Punch & Judy show and are accosted by vendors. Finally, Mary Ellen breaks down and tells George that she wants to go away from him. After his initial disbelief, he yells at her retreating back “What’s his name?”
She arrives at Henry Wallis’s studio, and it is obvious that her appearance there alone is a monumental shift in the relationship. He shows her the painting, and they kiss.
Our attention is redirected to a lofty Thomas Chatterton, who is no longer a ghostly figure, but himself as he was when he was young and alive. The ghost of Charles Wychwood appears and the journey of the Camera follows him.
Act 2 – The Journey of the Camera
We go to the Wychwood flat, where Harriet and Sarah Tilt have come, ostensibly to comfort Vivien in the wake of Charles’s death. Harriet tells Vivien that she is going to get Charles’s poems published and Vivien gives her the poems, the Chatterton manuscripts, and the portrait of middle-aged Chatterton. Harriet and Sarah leave, almost forgetting the poem, and Edward admonishes his mother that she shouldn’t have given Harriet the painting.
We follow Harriet back to Cumberland & Maitland, where she has come to determine the authenticity of the portrait. The gallery owners assure her it is not likely to be authentic but she blackmails them into doctoring it by her knowledge of the Seymour forgeries. Stewart Merk enters, having agreed to make the painting look more authentic to the dated year of 1802. He tells Cumberland that he can make it the best fake he’s ever seen, not noticing that Vivien has entered. Upon hearing that the painting was not real, she faints, horrified that her husband’s obsession was with a fiction.
We return to Harriet’s flat, where she is again gin-drunk. She monologues about the Anxiety of Influence and declares that everyone copies and is simply looking for their own shortcuts to fame. She decides that she has accomplished enough with her life and is no longer interested in the Chatterton mystery. She exhorts us to exit, and we pass Merk doctoring the painting. As he attempts to do so, something surreal happens and the painting burns him and is destroyed.
We continue on and end up in Bristol where we meet Pat, the gaudy character who gave the manuscripts to Charles in the first act. Soon, Philip arrives to meet Joynson. Joynson reveals that his ancestor, Samuel Joynson, the bookseller who was Chatterton’s friend and publisher, faked the manuscripts. It turns out that a rival bookseller published some of Chatterton’s letters posthumously and those letters accused Joynson of abandoning Chatterton to poverty. In order to get back at him, Joynson thought the best way would be to “out-trick the trickster” and employ another forgery. The middle-aged portrait was a part of the plot. Joynson wants all of the materials back since he thinks his ancestor never intended them to be published.
We then see a dream that Edward has, where his father has taken Chatterton’s place in the Henry Wallis painting. The real Edward emerges from the dream and runs into the Wychwood living room, where Philip is telling Vivien the results of his trip to Bristol. Upon hearing that the portrait was destroyed, Edward is happy, but concerned for the Wallis painting and asks, “what about the other one? The good one, the one that mustn’t be killed?” Vivien, who has not seen The Death of Chatterton, claims there was only one painting, but Edward (and we) know better. Philip tells Vivien that Charles’s theory has inspired him, and he wants to write a book about it. Vivien agrees, and the two kiss, to Edward’s approval.
Act 2 – The Journey of the Paintbrush
When the journey of the Camera leaves to follow the ghost of Charles Wychwood, we remain with the young and lively Chatterton. He is doing accounts on how much income he can expect from writing elegies and satires for a patron who has died. He is having health problems, which his friend Dan assures him is the clap, caught from his landlady, to whom he lost his virginity. Dan tells him there’s a London kill-or-cure; take four grains of arsenic in a dessert spoon of opium and you are cured of the clap.
Chatterton thanks him and heads to the corner druggist to purchase the necessary ingredients. On his way back to his garret home he meets some strange and ominous characters. He returns home, slightly drunk, and takes his kill-or-cure with a toast to posterity. His death is almost instanteous, but likely an accidental mis-dose rather than an intentional suicide.
In addition, it quickly dissolves in the body and the patient will feel the effect in a couple of hours.
We return to the Wychwood flat, where we discover Philip with Vivien. They have now learned that the painting (and therefore the manuscripts) were forgeries. We learn that time has passed and Philip has been a great friend to Vivien and Edward as they grieved for Charles. Philip offers to go back to Bristol to convince Joynson to demand the papers back from Harriet. This is to ensure that they are not published and Charles’s theory is not disproved. Philip and Viven share a brief, tender moment before we leave.
Following Philip to Bristol, we pass Merk doctoring the painting. As he attempts to do so, something surreal happens and the painting burns him and is destroyed.
Here we meet Pat, the gaudy character who gave the manuscripts to Charles in the first act. Pat allows Philip in to meet Joynson. Joynson reveals that his ancestor, Samuel Joynson, the bookseller who was Chatterton’s friend and publisher, faked the manuscripts. It turns out that a rival bookseller published some of Chatterton’s letters posthumously and those letters accused Joynson of abandoning Chatterton to poverty. In order to get back at him, Joynson thought the best way would be to “out-trick the trickster” and employ another forgery. The middle-aged portrait was a part of the plot. Joynson wants all of the materials back since he thinks his ancestor never intended them to be published.
We then see a dream that Edward has, where his father has taken Chatterton’s place in the Henry Wallis painting. The real Edward emerges from the dream and runs into the Wychwood living room, where Philip is telling Vivien the results of his trip to Bristol. Upon hearing that the portrait was destroyed, Edward is happy, but concerned for the Wallis painting and asks, “what about the other one? The good one, the one that mustn’t be killed?” Vivien, who has not seen The Death of Chatterton, claims there was only one painting, but Edward (and we) know better. Philip tells Vivien that Charles’s theory has inspired him, and he wants to write a book about it. Vivien agrees, and the two kiss, to Edward’s approval.